Filing income tax returns is something everyone dreads. That isn't without reason, because the sheer complexity makes most mortals concede defeat and run to their chartered accountants.
Note: This guide applies only to salaried individuals.
The most important part of this exercise is to procure the Form 16, which is provided by your employer. It is a statement of your taxable salary, allowed deductions, and the tax that has been paid on your behalf. Also, banks and other financial instutions that deduct tax on the interest due to you are supposed to supply you with the Form 16A.
If that sounds Greek and Latin, all you need to do is contact the HR department and demand a copy of your Form 16. This needs to be done before 31st July, if you are eligible for tax refunds (this depends on the tax slab you fall in). However, if you aren't eligible and your salary is under 5 lakhs, you are exempt from filing returns. It is prudent to do so nonetheless. This is especially true if you intend to apply for home \ car loans in the future, since that requires I-T return details spanning the last three years.
With the Form 16 sorted out, you can then log on to the INCOMETAX INDIA website.
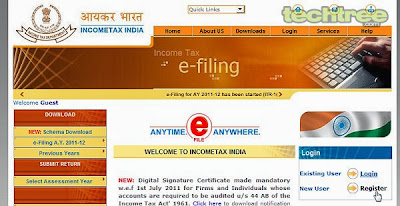
Step 1: Click on the Register link to create a new account. You are then prompted to enter your PAN number, which is assigned as your user ID.
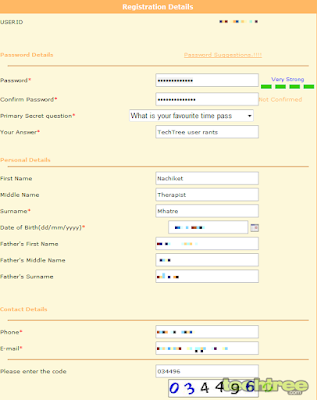
Step 2: Enter your details in the registration form, following which you will receive a confirmation mail in the inbox of the specified email address. Keep your PAN card handy, because the details have to match those mentioned on the card.
Step 3: After verifying and logging into your spanking new account, you need to view the Form 26AS statement and ensure that the Tax Deducted at Source (TDS) amount matches the one mentioned in your Form 16. However, if the TDS amount in the Form 16 is more than that reflected in the Form 26AS, you cannot file your I-T return online. You will then have to contact your CA or the Form 16 issuer to correct the discrepancy.
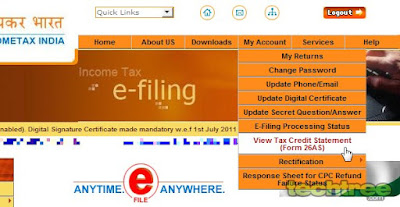
To view the 26AS statement, click on the View Tax Credit Statement (Form 26AS) under the My Account drop-down menu at the top.
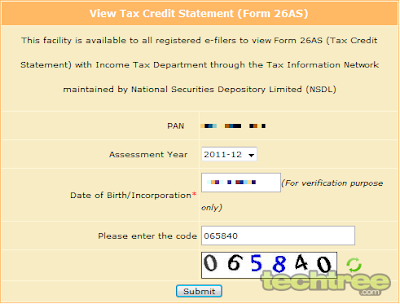
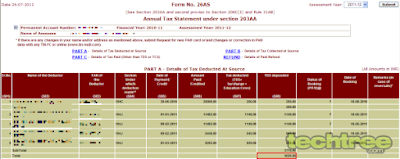
Step 4: In the subsequent form, select Assessment Year 2011-12 from the drop-down box, enter your Date of Birth, and click Submit.
Step 5: Note down the total TDS deposited (highlighted by the red box) and verify if it matches with the amount mentioned in your Form 16.
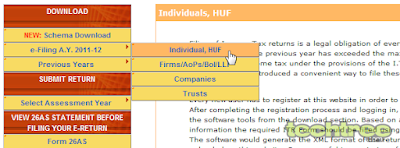
Step 6: Now, we need to download the I-T Return utility. To do so, select Individual, HUF from the e-Filing menu under the Download section at the top of the left hand side bar.
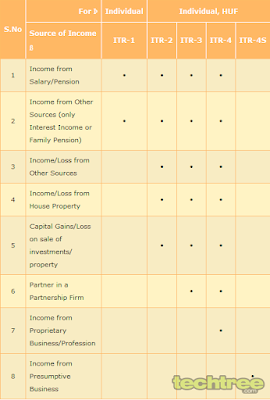
Use the table below to check which one of the ITR forms you are supposed to fill. Since this guide only covers salaried individuals, you'll have to select ITR-1. However, if you own a business or have amassed a truckload of money after selling off property, this guide is of no use to you. Then again, you're rich enough to hire a CA anyway.
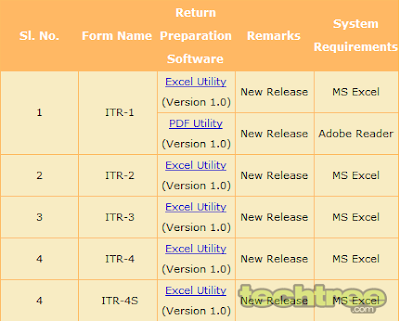
That means you have to download either the PDF or Excel version of the I-T Return utility.
Step 7: Open the I-T Return utility downloaded in the previous step. The examples illustrated below use the PDF version of the utility. Get your Form 16 ready, as most details are to be copied over from the same. This section is fairly straightforward. Enter your name, address, birth date, PAN number, and fill up the numbers in Fields 1 and 2 from the Form 16 (details below). Field 3 (yellow box) is the sum of the interest earned from your bank accounts, FDs, etc.
Unless you are employed by the Indian government or in a Public Sector Undertaking (PSU), select the Others check box in the Employer Category (highlighted in purple). Keep the default value for the Return Filed Under field (denoted by a brown box).
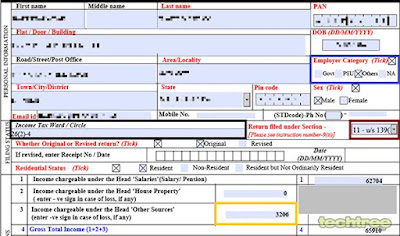
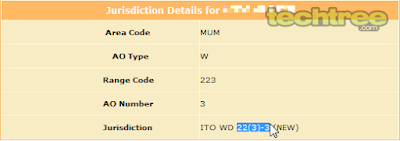
The Income Tax Ward \ Circle value (marked in black) requires a bit more effort. Head back to the website and click on Know Jurisdiction under the Services drop-down menu at the top. Copy your Jurisdiction code as shown below. You only need to copy the numbers and not the letters. Paste the same in the Income Tax Ward \ Circle box.

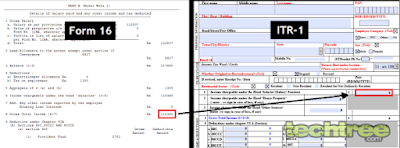
Remember, Field 1 in the ITR-1 has to be filled with the amount mentioned in the Gross Total Income field in your Form 16, as illustrated below:

Step 8: Fields 16, 17, 18, and 19 are calculated based on the values you will enter in Field 23. Details below.
Field 20 lets you specify the bank account where you want the tax refunds, if any, to be credited. The next two fields allow you to choose between a direct wire transfer or cheque-based refund. If you choose the former, you have to specify your MICR code (printed in your cheque book). Set the bank account type to Savings.
Field 23 deals with TDS details. You have to fill the name and TAN number of your employer(s), and the associated numbers - all of which can be found in the Form 26AS. If you have drawn money from more than one employer, you can add an additional row by pressing the [+] button at the left margin, whereas the [x] button kills unwanted rows.
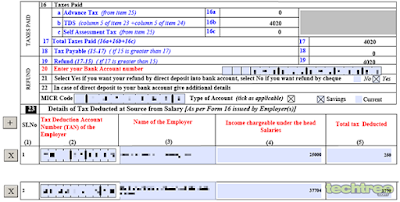
Field 24 is meant to fill in TDS details on your income from investments such as fixed deposits, while Field 25 deals with Advance Tax and Self Assessment Tax. The latter is best illustrated with this example: suppose you have a large sum in the bank account earning you a tidy interest that is already taxed at the default rate of 10%. However, your income actually puts you in the 20% slab. This is where you honestly inform the government of the same, by paying the tax through any nationalised bank and receiving a Challan Number. While it's easy to get away without doing so, you'll be in a big doo-doo in the rare case that the authorities decide to audit you. You know how the saying goes: Honesty is the best policy.
.png)
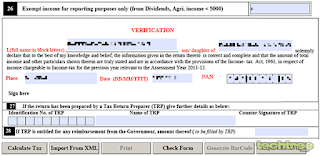
Fill in your verification details and then click the Calculate Tax button at the bottom. Then click on the Check Form button to weed out any mistakes or omissions. Once you do that, the Export to XML button (in the bottom right corner) will become active. Click on it and save the XML report to your hard drive
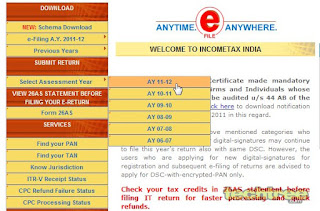
Step 9: Now, we need to submit the XML report. To do so, head back to the website (make sure you're still logged in) and select AY 11-12 from the Select Assessment Year menu under the Submit Return section in the left hand side bar
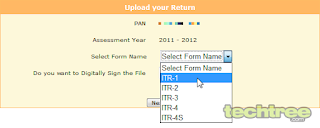
In the subsequent form, select ITR-1 from the drop-down box and hit Next. You may choose to digitally sign the form, but that entails some more effort on your part to submit your digital signature for verification. I have chosen to skip that step. However, if you use a digital signature, you have to upload that along with the XML file, then head over to Step 11.
Step 10: You will now be given a printout of your return, which you need to print, sign, and submit to the address mentioned in the form itself. Please note that the submissions have to be sent through regular post only, within 120 days. In due course of time, you will receive an acknowledgement email from the I-T department.
Step 11: Congratulations, you have successfully filed your I-T returns online.
 Step 2: Enter your details in the registration form, following which you will receive a confirmation mail in the inbox of the specified email address. Keep your PAN card handy, because the details have to match those mentioned on the card.
 Step 3: After verifying and logging into your spanking new account, you need to view the Form 26AS statement and ensure that the Tax Deducted at Source (TDS) amount matches the one mentioned in your Form 16. However, if the TDS amount in the Form 16 is more than that reflected in the Form 26AS, you cannot file your I-T return online. You will then have to contact your CA or the Form 16 issuer to correct the discrepancy.
To view the 26AS statement, click on the View Tax Credit Statement (Form 26AS) under the My Account drop-down menu at the top.
 Step 4: In the subsequent form, select Assessment Year 2011-12 from the drop-down box, enter your Date of Birth, and click Submit.
 Step 5: Note down the total TDS deposited (highlighted by the red box) and verify if it matches with the amount mentioned in your Form 16.
 Step 6: Now, we need to download the I-T Return utility. To do so, select Individual, HUF from the e-Filing menu under the Download section at the top of the left hand side bar.
 Use the table below to check which one of the ITR forms you are supposed to fill. Since this guide only covers salaried individuals, you'll have to select ITR-1. However, if you own a business or have amassed a truckload of money after selling off property, this guide is of no use to you. Then again, you're rich enough to hire a CA anyway.
 That means you have to download either the PDF or Excel version of the I-T Return utility.
 Step 7: Open the I-T Return utility downloaded in the previous step. The examples illustrated below use the PDF version of the utility. Get your Form 16 ready, as most details are to be copied over from the same. This section is fairly straightforward. Enter your name, address, birth date, PAN number, and fill up the numbers in Fields 1 and 2 from the Form 16 (details below). Field 3 (yellow box) is the sum of the interest earned from your bank accounts, FDs, etc.
Unless you are employed by the Indian government or in a Public Sector Undertaking (PSU), select the Others check box in the Employer Category (highlighted in purple). Keep the default value for the Return Filed Under field (denoted by a brown box).
 The Income Tax Ward \ Circle value (marked in black) requires a bit more effort. Head back to the website and click on Know Jurisdiction under the Services drop-down menu at the top. Copy your Jurisdiction code as shown below. You only need to copy the numbers and not the letters. Paste the same in the Income Tax Ward \ Circle box.

 Remember, Field 1 in the ITR-1 has to be filled with the amount mentioned in the Gross Total Income field in your Form 16, as illustrated below:

 Step 8: Fields 16, 17, 18, and 19 are calculated based on the values you will enter in Field 23. Details below.
Field 20 lets you specify the bank account where you want the tax refunds, if any, to be credited. The next two fields allow you to choose between a direct wire transfer or cheque-based refund. If you choose the former, you have to specify your MICR code (printed in your cheque book). Set the bank account type to Savings.
Field 23 deals with TDS details. You have to fill the name and TAN number of your employer(s), and the associated numbers - all of which can be found in the Form 26AS. If you have drawn money from more than one employer, you can add an additional row by pressing the [+] button at the left margin, whereas the [x] button kills unwanted rows.
 Field 24 is meant to fill in TDS details on your income from investments such as fixed deposits, while Field 25 deals with Advance Tax and Self Assessment Tax. The latter is best illustrated with this example: suppose you have a large sum in the bank account earning you a tidy interest that is already taxed at the default rate of 10%. However, your income actually puts you in the 20% slab. This is where you honestly inform the government of the same, by paying the tax through any nationalised bank and receiving a Challan Number. While it's easy to get away without doing so, you'll be in a big doo-doo in the rare case that the authorities decide to audit you. You know how the saying goes: Honesty is the best policy.
.png) Fill in your verification details and then click the Calculate Tax button at the bottom. Then click on the Check Form button to weed out any mistakes or omissions. Once you do that, the Export to XML button (in the bottom right corner) will become active. Click on it and save the XML report to your hard drive
Fill in your verification details and then click the Calculate Tax button at the bottom. Then click on the Check Form button to weed out any mistakes or omissions. Once you do that, the Export to XML button (in the bottom right corner) will become active. Click on it and save the XML report to your hard drive
 Step 9: Now, we need to submit the XML report. To do so, head back to the website (make sure you're still logged in) and select AY 11-12 from the Select Assessment Year menu under the Submit Return section in the left hand side bar
 In the subsequent form, select ITR-1 from the drop-down box and hit Next. You may choose to digitally sign the form, but that entails some more effort on your part to submit your digital signature for verification. I have chosen to skip that step. However, if you use a digital signature, you have to upload that along with the XML file, then head over to Step 11.
 Step 10: You will now be given a printout of your return, which you need to print, sign, and submit to the address mentioned in the form itself. Please note that the submissions have to be sent through regular post only, within 120 days. In due course of time, you will receive an acknowledgement email from the I-T department.
Step 11: Congratulations, you have successfully filed your I-T returns online.